Thank you for choosing the Lucky1 app. We are pleased to have you with us. Enclosed is the documentation to help you set up and launch the app easily. Please read it carefully, as it
contains important information. If you need any assistance or have questions, our support team is just a message away.
Server Setup
Step 1 : Create a Domain
in plesk panel like lucky1.in
Step 2 : Extract The Project
Connect to the server via SSH using tools like WinSCP for file transfer and PuTTY for command line access.
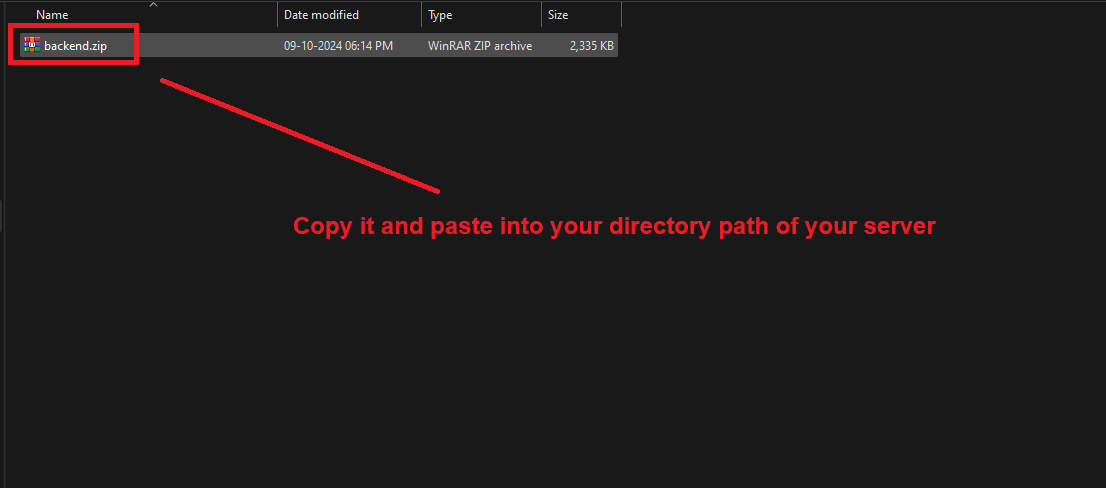
Please transfer the backend zip file to the your directory path directory of your server.
After navigating to the your directory path, use the following command to unzip the backend zip file:
cd /your-directory-pathunzip backend.zip -d /your-directory-path
Step 3 : Setup node.js
Follow this links setup node.js in linux server link
After Installation Of Node.js Install Pm2 library for run your project Using below command
npm install -g pm2
After navigating to the your directory path
First, install the dependencies using the following command:
npm install
After, install the dependencies start project using following command:
pm2 start index.js --name [name of your service]
Admin Panel Setup
Step 1: Update Server URL
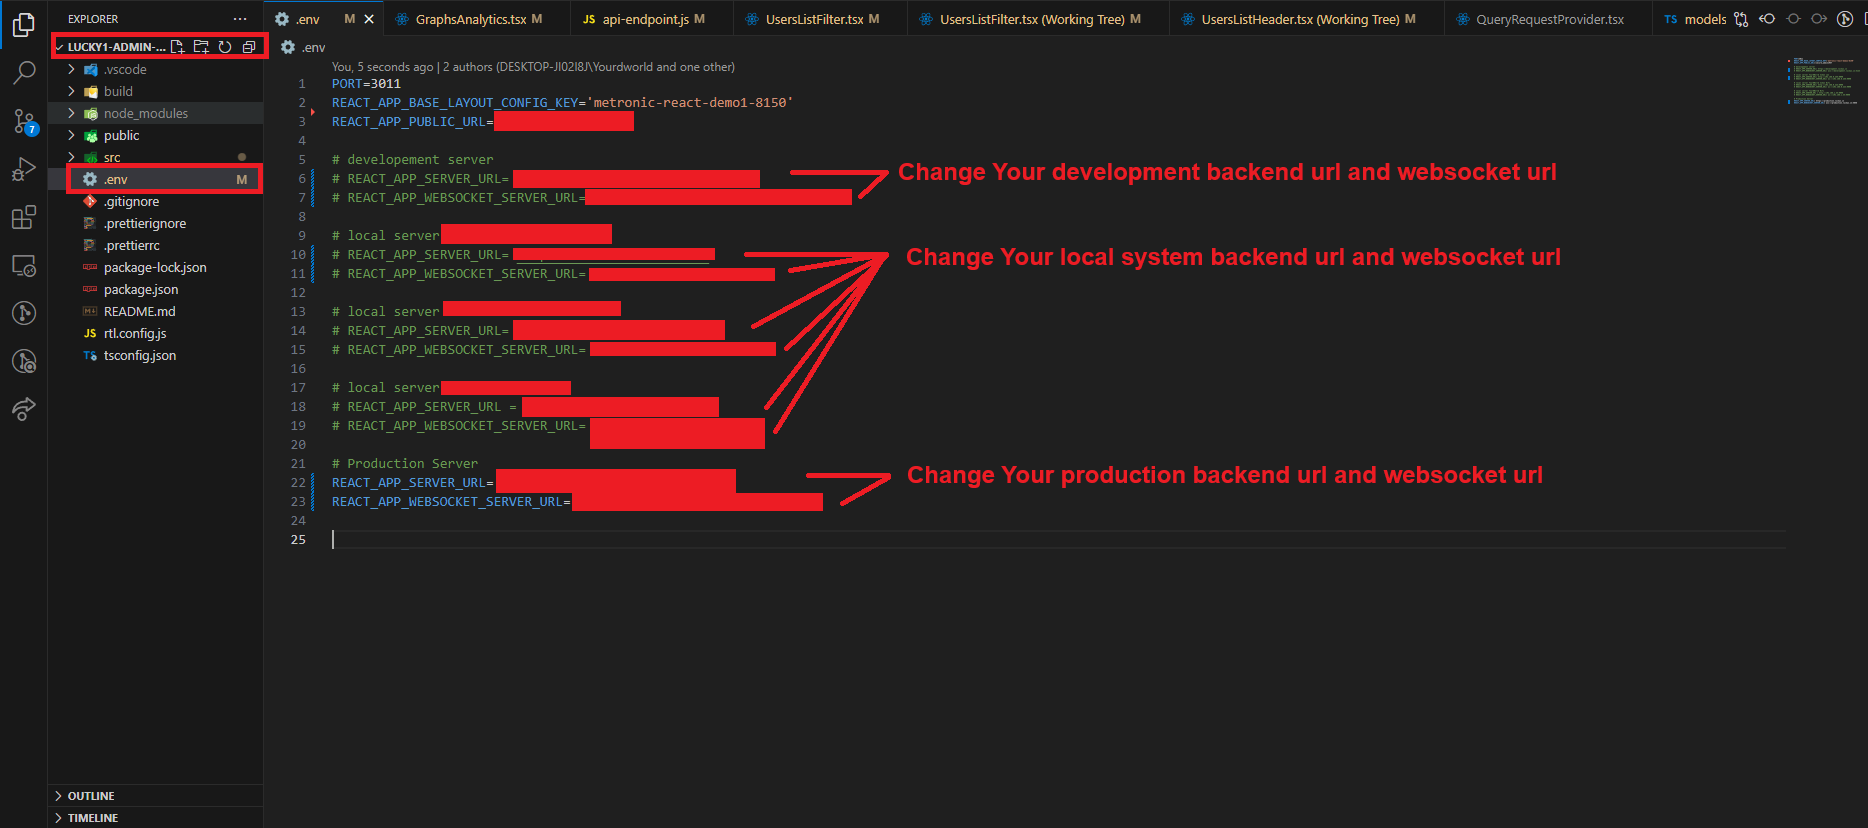
In the admin panel code, open the .env file and update the backend URL and WebSocket URL as shown in the image below.
Step 2: Create a Build
To create a build, open a terminal and run the following command:
npm run build
Once the build is complete, you can package it as a zip file for reference or deployment.
Step 3: Upload the Build
Navigate to the backend server directory by running this command:
cd /your-directory-path
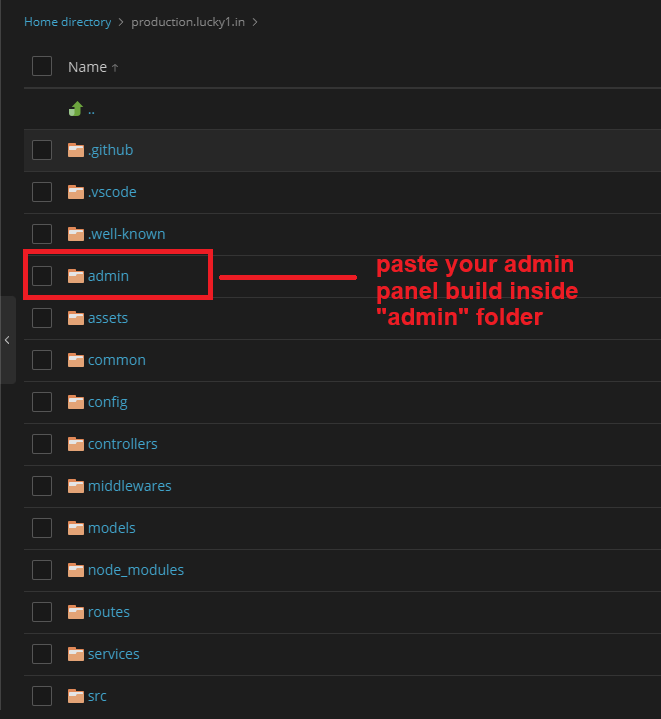
Copy the build files and paste them into the admin folder of your backend server.
Import SQL files
Step 1: Set Up the SQL Database
On your server, open your domain management dashboard and navigate to the Databases section.
Create a new database. Be sure to copy and save the database name, username, and password for future reference.
Once the database is created, open it in phpMyAdmin.
In phpMyAdmin, import your SQL file to set up the initial database structure and data.
Step 2: Connect to the SQL Database
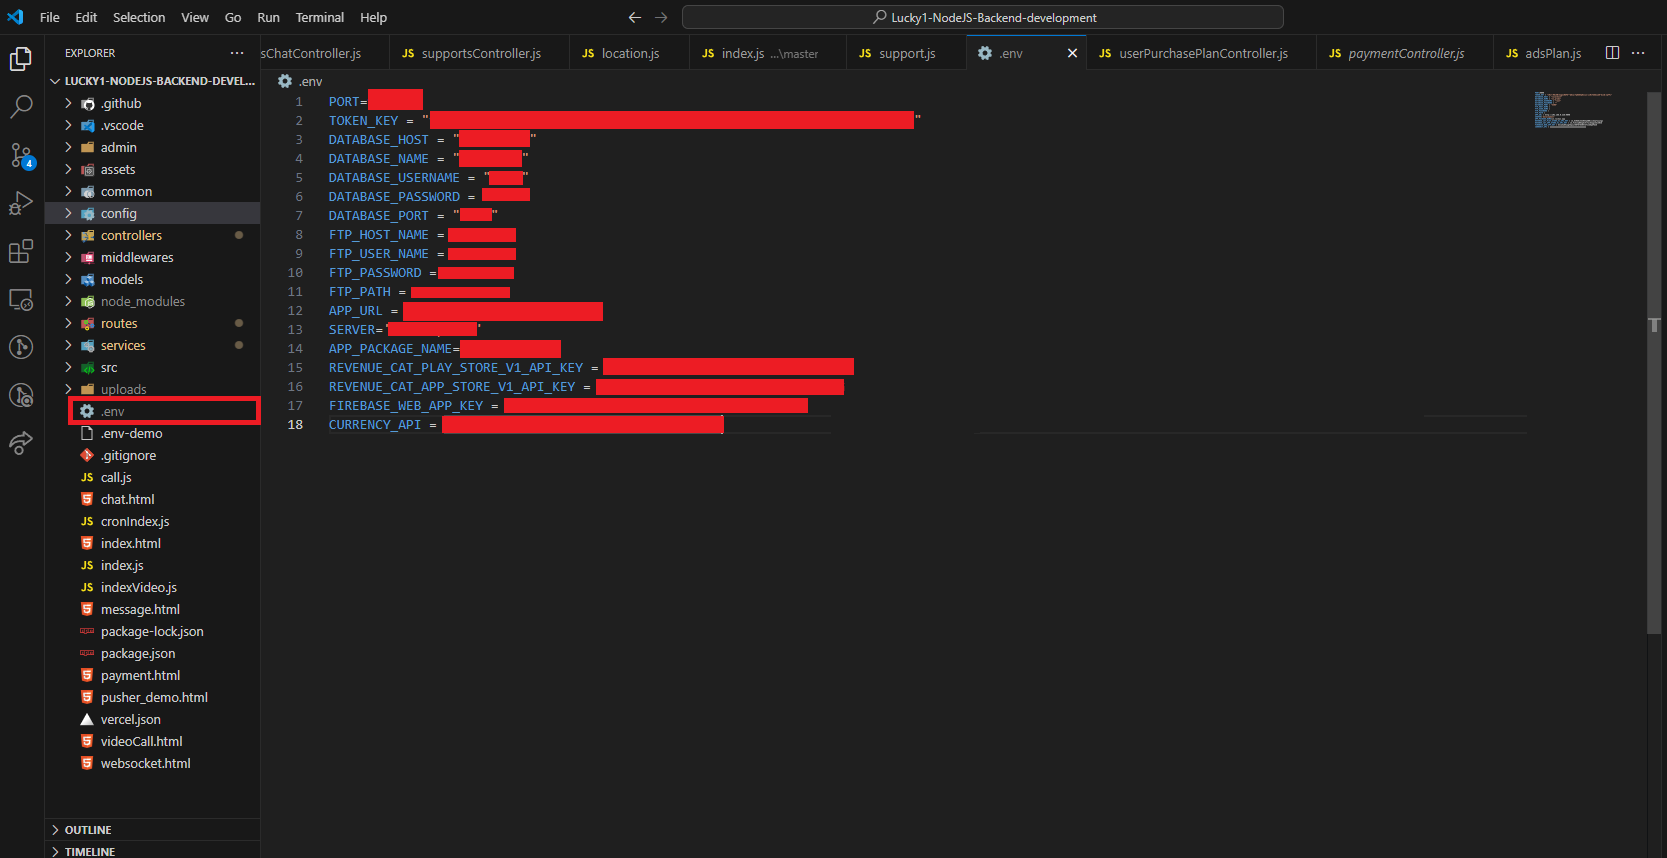
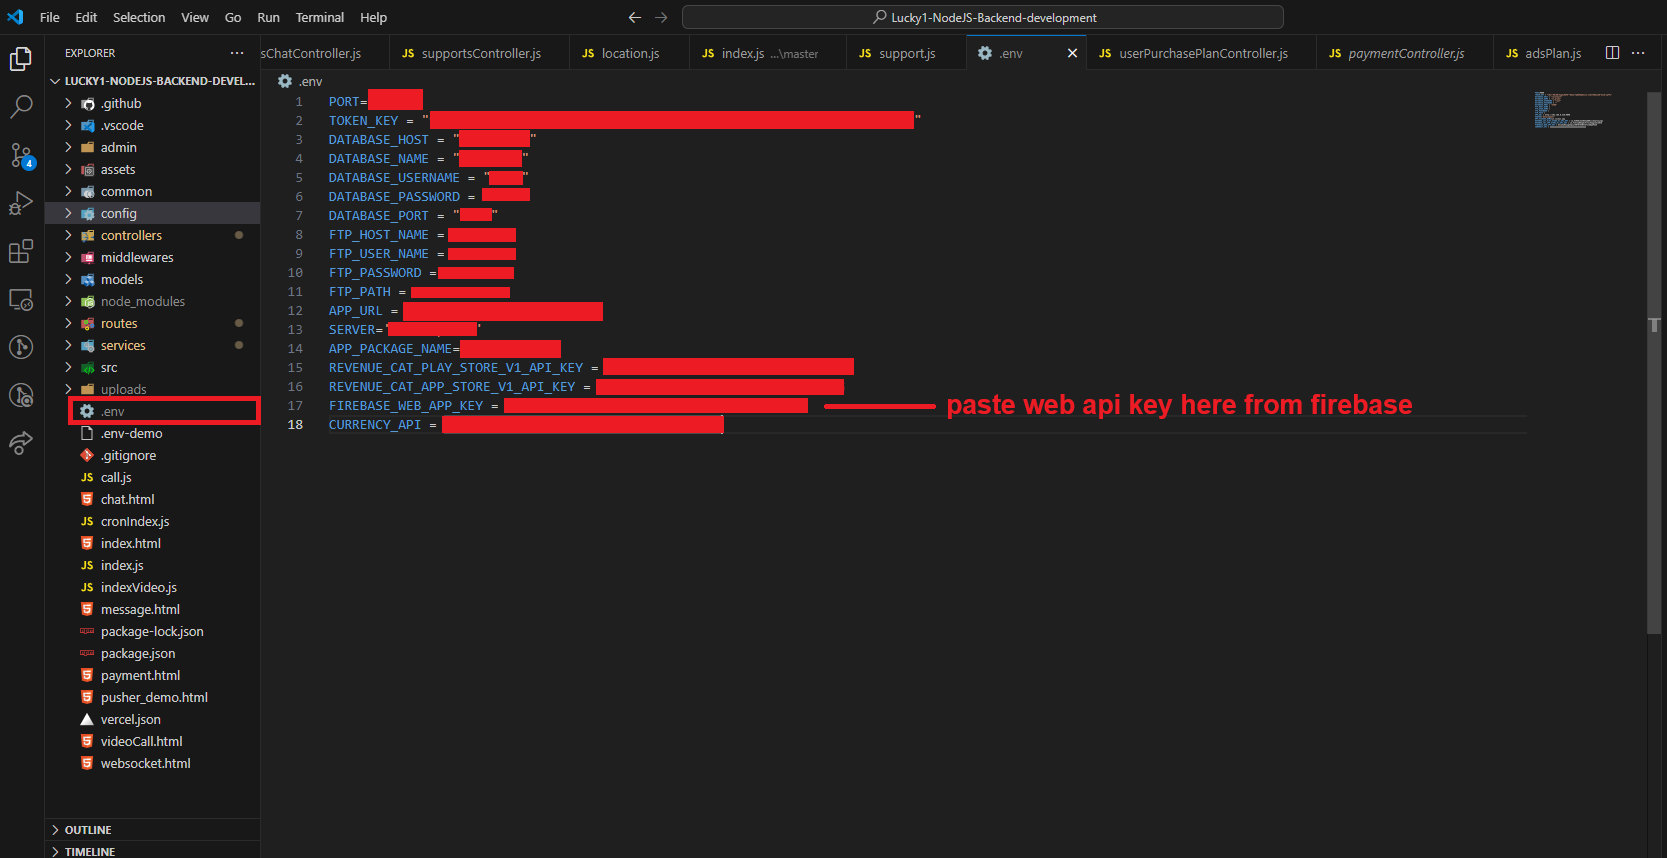
After successfully importing the SQL file, locate your server’s backend project directory, specifically the .env file (often found at the root of your backend directory).
Open the .env file, and replace the placeholders with the DATABASE_NAME , DATABASE_USERNAME ,DATABASE_PORT and DATABASE_PASSWORD that you saved earlier.
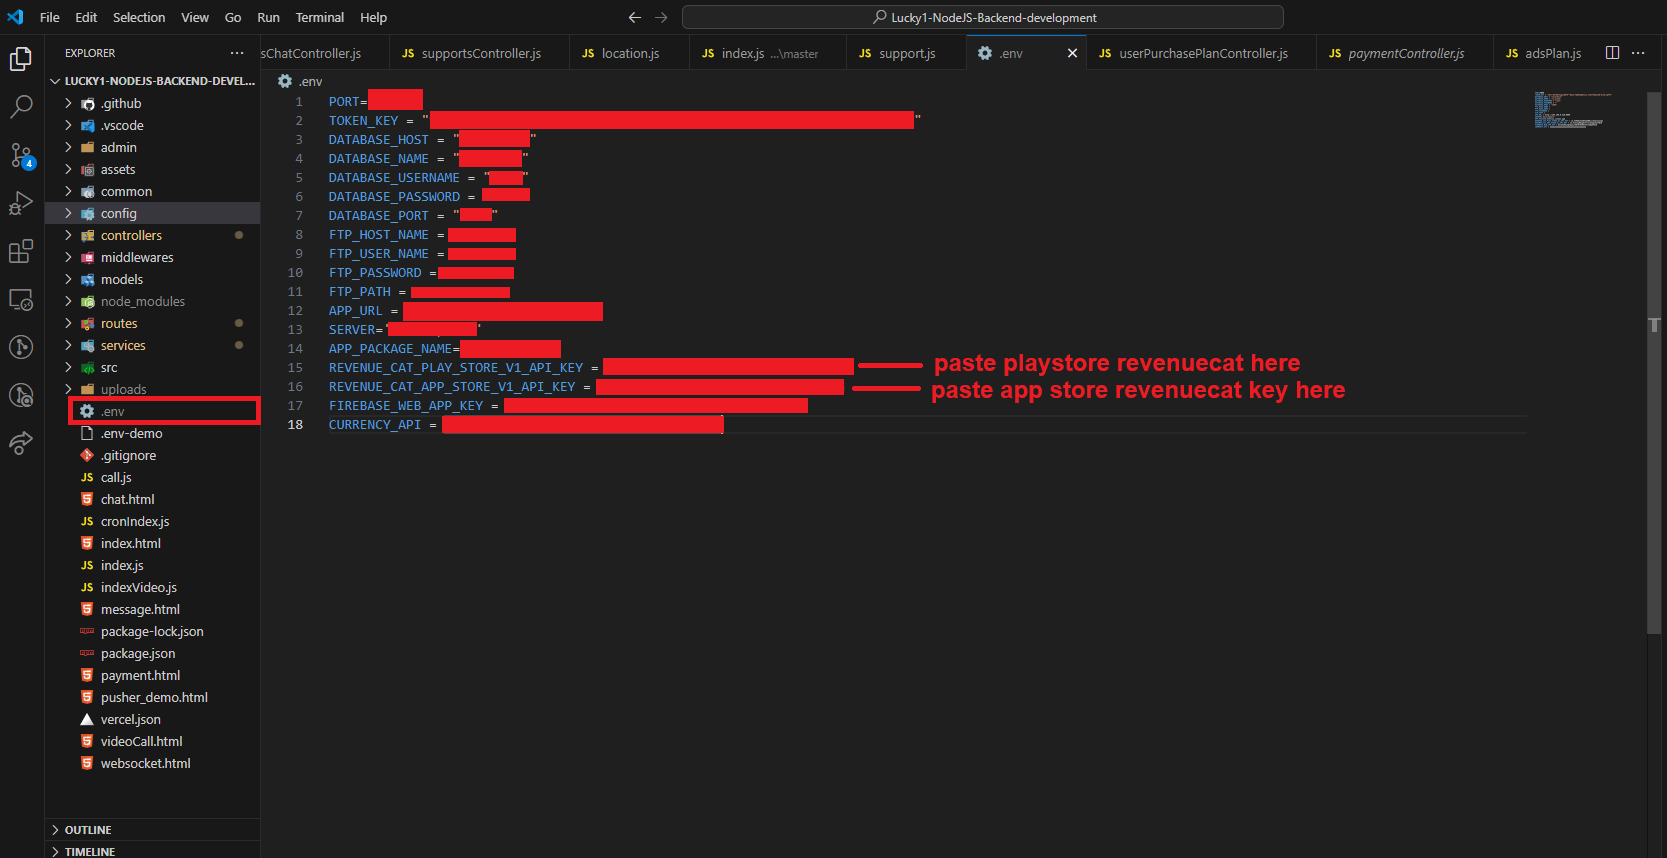
Env file explain
PORT: The port number where your Node.js project runs. Commonly, 3000 or 5000.
TOKEN_KEY: A secret key used for JWT encryption and authentication for API requests.
DATABASE_HOST: The SQL database hostname. Usually set to "localhost" for local development.
DATABASE_NAME: The name of your SQL database.
DATABASE_USERNAME: The username required to access your database.
DATABASE_PORT: The port number for your database. Typically set to 3306 for MySQL/MariaDB.
DATABASE_PASSWORD: The password associated with your database username.
APP_URL: The URL of your backend server, which your frontend or other services will connect to.
SERVER: Specifies the environment mode. Set to development for local testing or production for live servers.
APP_PACKAGE_NAME: The Android package name for your app, necessary for in-app purchases.
REVENUE_CAT_PLAY_STORE_V1_API_KEY: Your RevenueCat API key for the Google Play Store.
REVENUE_CAT_APP_STORE_V1_API_KEY: Your RevenueCat API key for the Apple App Store.
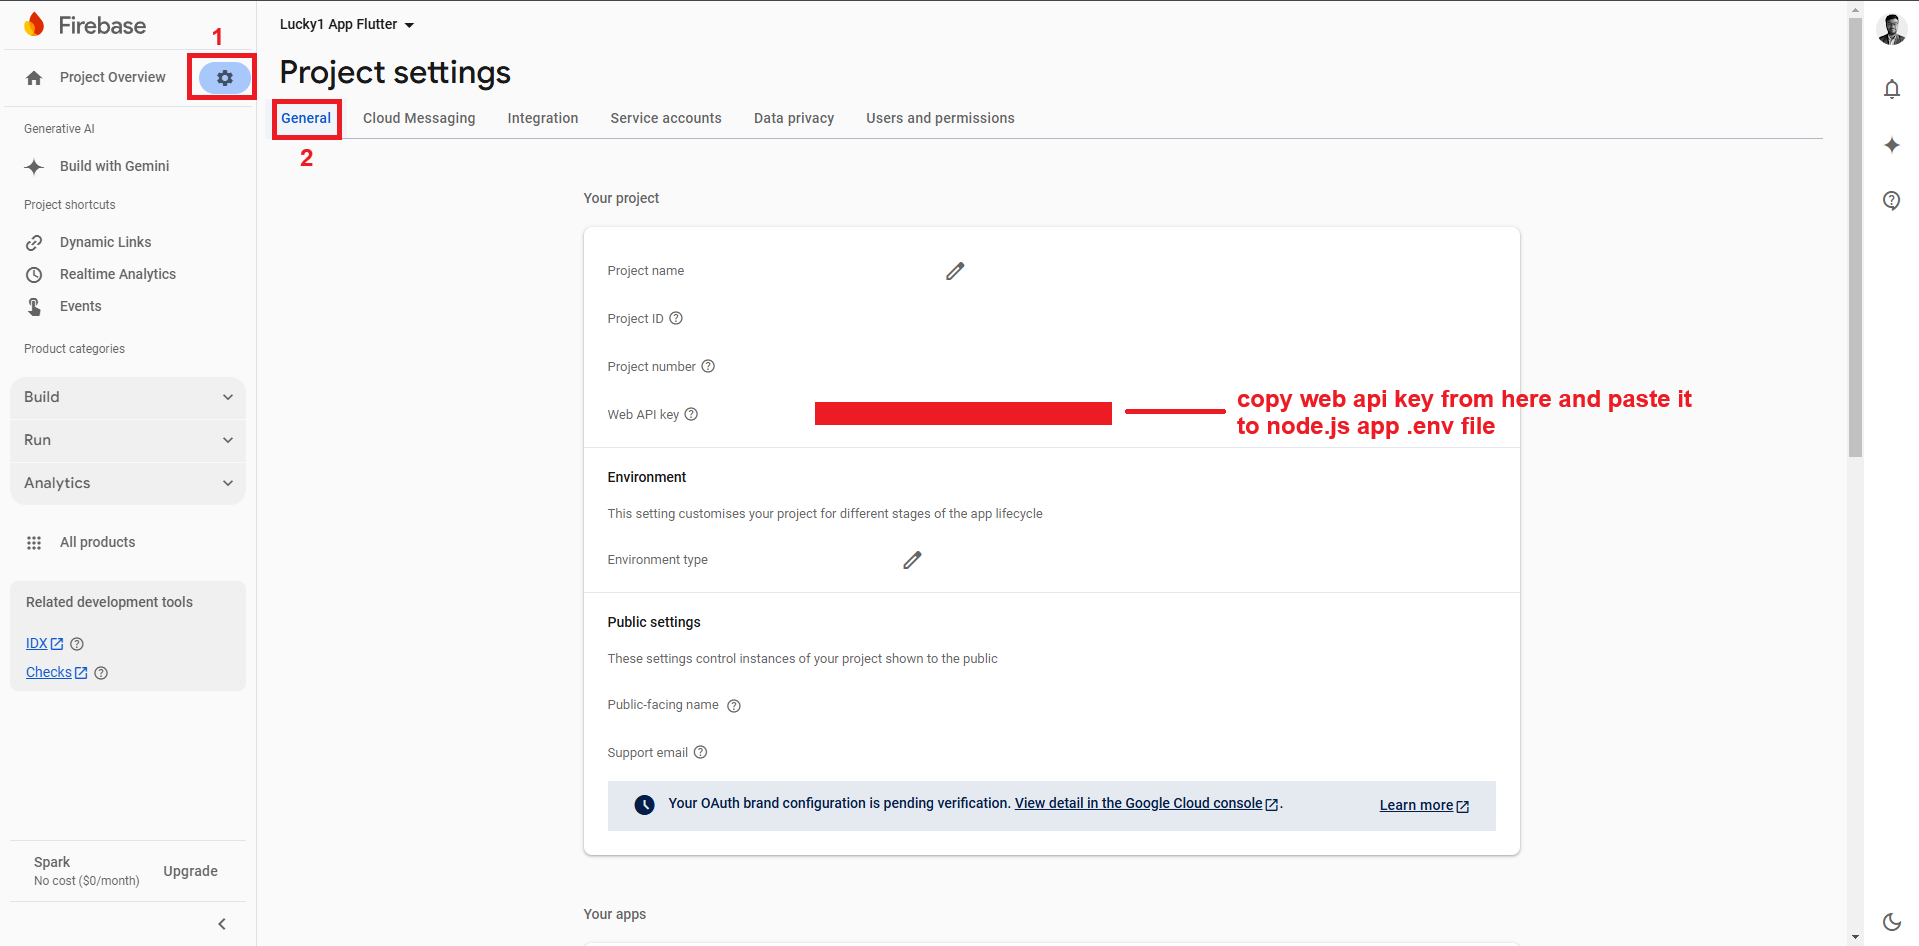
FIREBASE_WEB_APP_KEY: Firebase API key, used for handling dynamic links.
CURRENCY_API: Your currency API Key, for example, CurrencyAPI, which provides exchange rates and currency conversions.
SSL Certificate Setup
SSL Certificates enable secure HTTPS connections for your server.
Step 1: Obtain a PEM File
On your server, open the domain management dashboard and navigate to the SSL/TLS Certificate section.
Click on Advanced Settings.
Locate your domain's certificate, usually labeled Let’s Encrypt, and download it in PEM format.
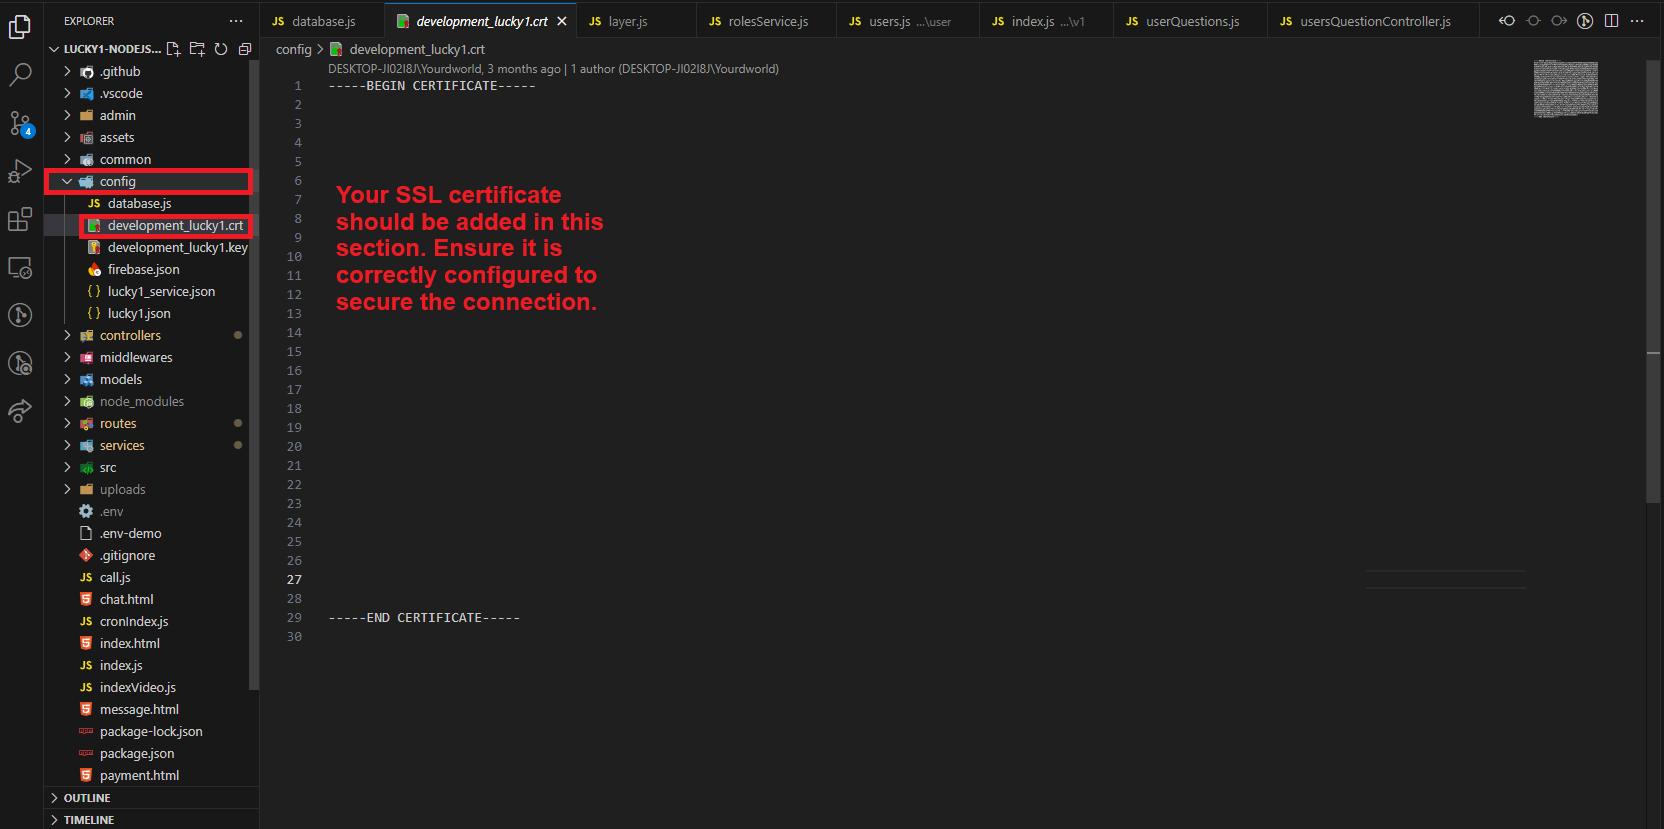
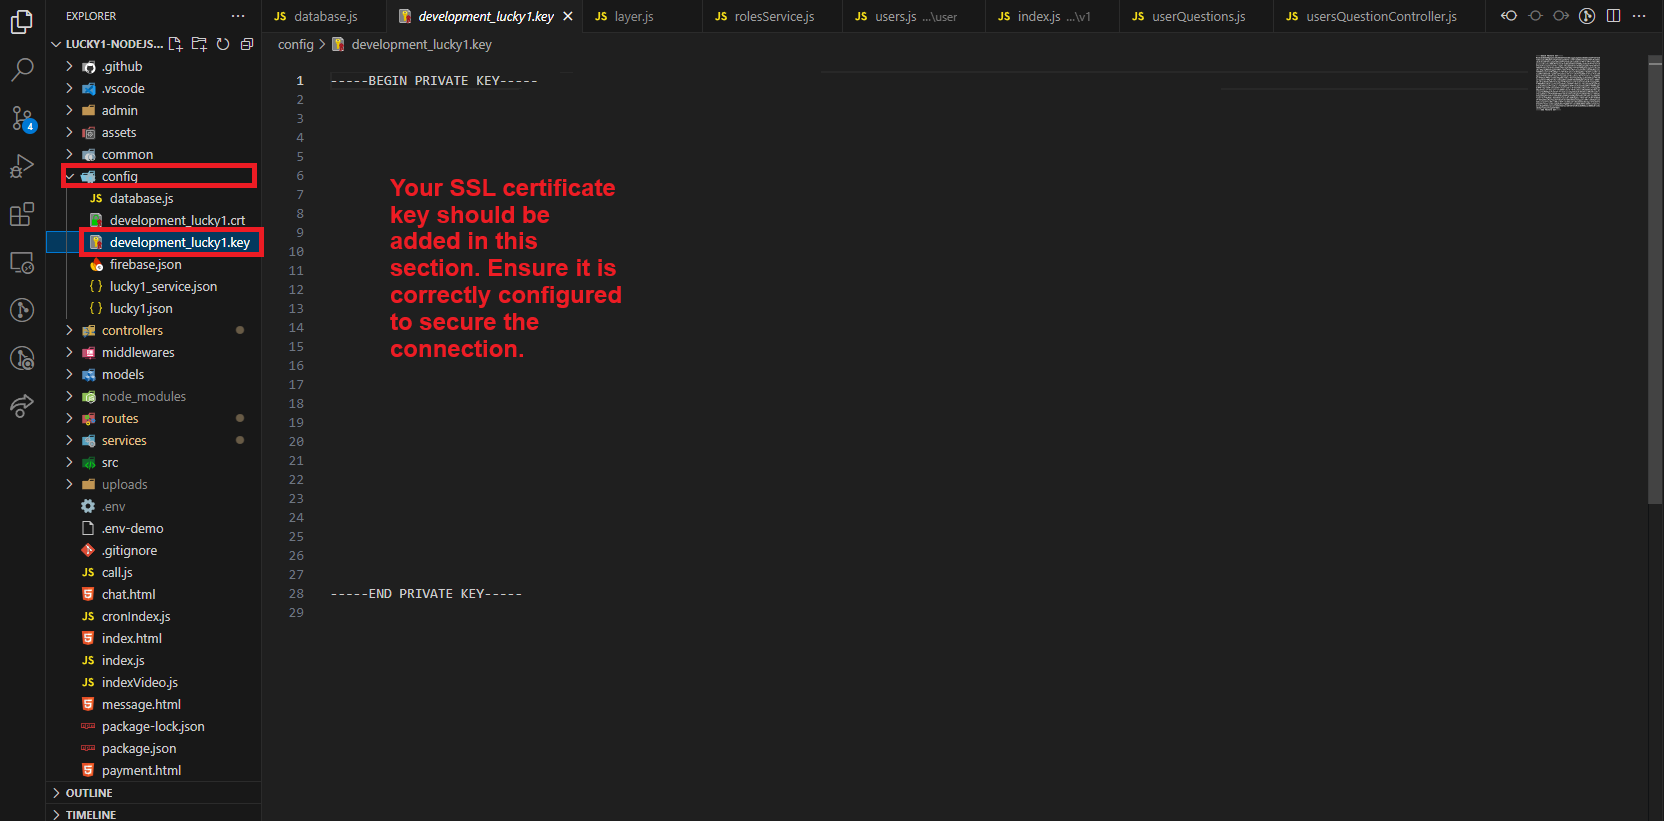
Step 2: Update SSL Certificate and Key Files
In your backend server's config directory, replace the contents of production_lucky1.crt with the PEM certificate file’s content. Look for content starting with -----BEGIN CERTIFICATE-----.
In the same config directory, replace the contents of production_lucky1.key with the PEM file’s key. Look for content starting with -----BEGIN PRIVATE KEY-----.
After making these changes, restart your Node.js server to apply the SSL updates.
Refer to the images below to verify the correct placement of the certificates:
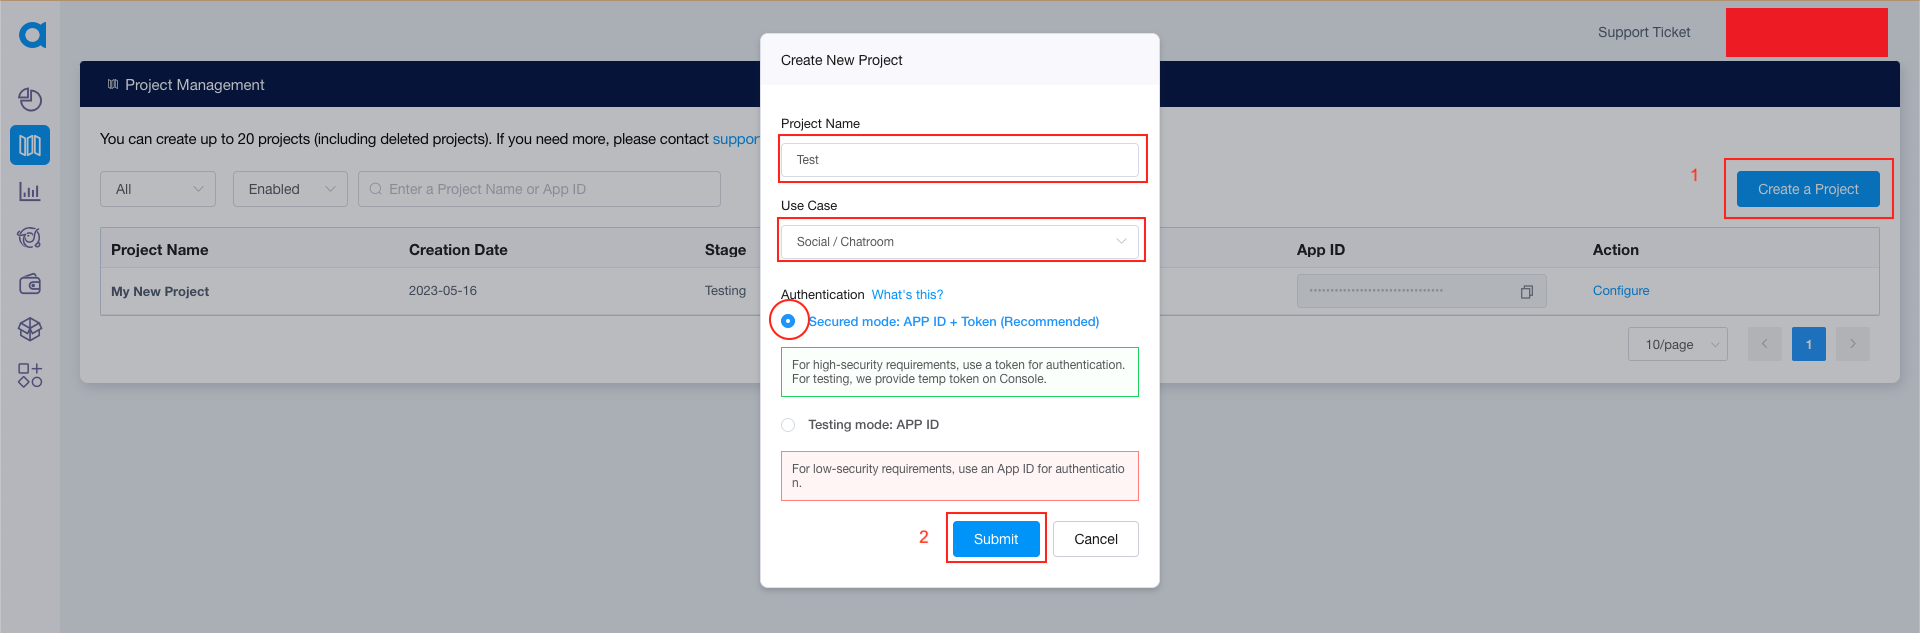
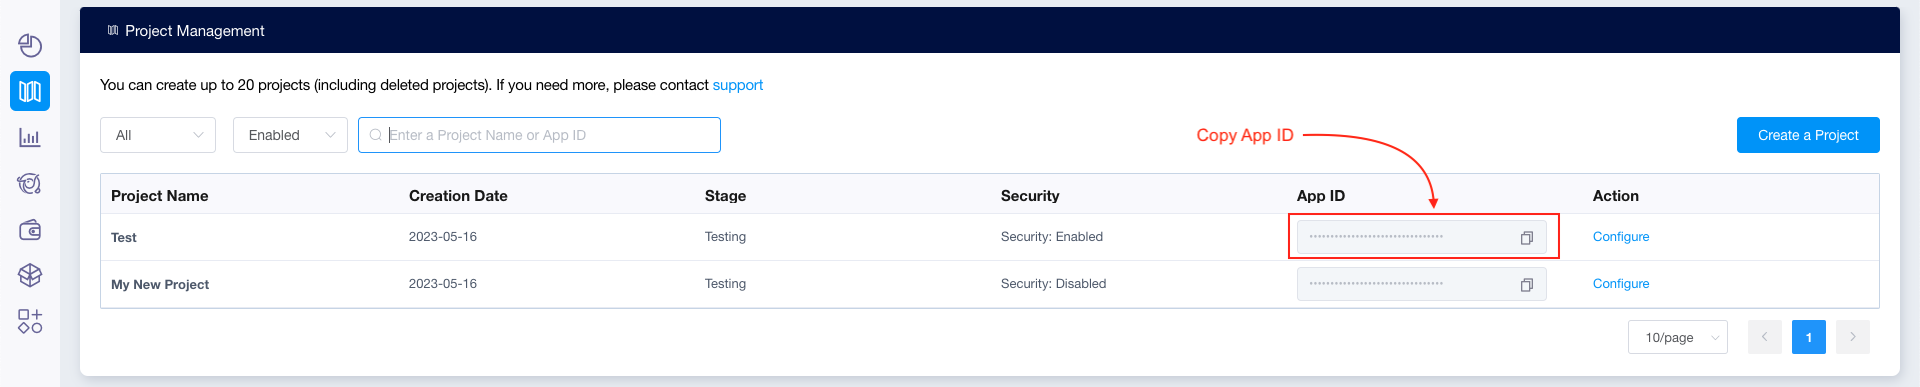
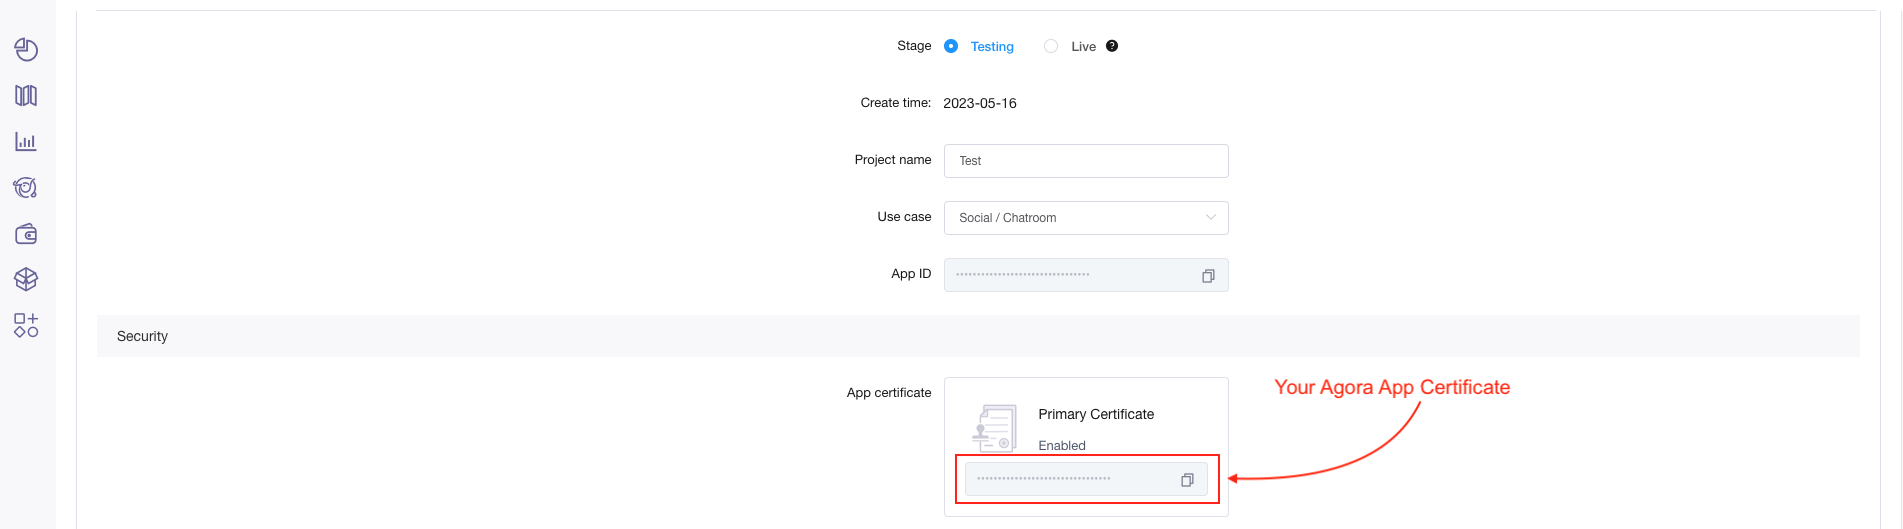
SetUp Agora
How to setup project at agora and getting credentials
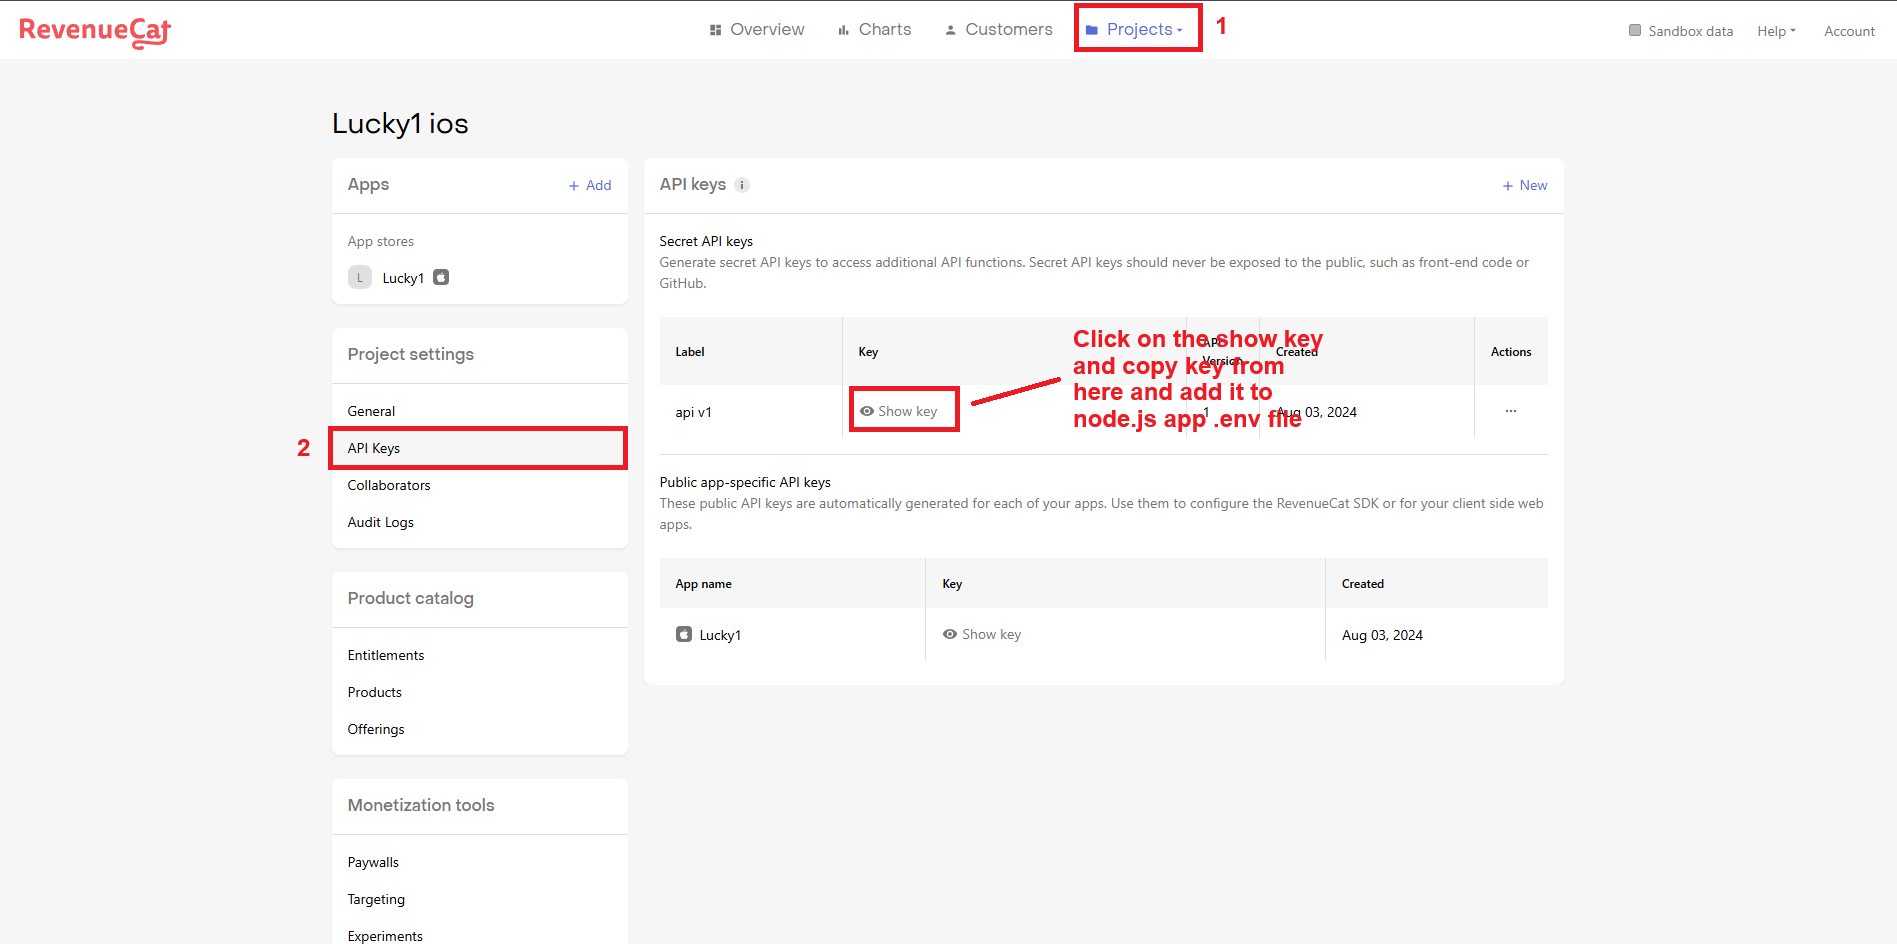
Next, you need to add the App Store Key and Play Store Key to code. You
can get these keys by going to the RevenueCat dashboard > API Keys > Secret Api Keys. Copy and paste these keys into the respective fields of code.
Copied key paste to config > .env.
SMTP Configuration
The first step of the process is to create an email account on your hosting package.
Once you have your email account created, you can proceed with the actual configuration of your Lucky1 website.
You need to access your website as administrator and go to SMTP settings from
Admin Panel -> Plugin -> SMTP config
Edit the following options:
SMTP Host -mail.example.com (change example.com to your actual domain)
SMTP Username - Enter the email account created in the previous chapter
SMTP Password - Enter the password for your email account
SMTP Port - server port, most used 587 for TLS, and 465 for SSL encryption
I made the changes above but my website is not sending any emails, what I can do?
Please test your SMTP credentials at SMTPER, if the same
config worked by the test, please contact us.